论文一作是 Alexey Dosovitskiy 、 Kucas Beyer 、 Alexander Kolesnikov 、 Drik Weissenborn 、Xiaohua Zhai
机构是 Google Reasearch, Brain Team
论文是 ICLR 2021 的论文
论文只开源了 Fine-tuning 代码
论文概述
Transformer 在 CV 领域的使用存在局限(2020年),注意力机制一般用来连接卷积神经网络,或者用来替换卷积神经网络一定的组件而不改变整体的结构。这篇论文证明卷积神经网络不是必要的,而且一个纯 Transformer 能够直接将图片序列化(拆成一个个区域pathes),并在分类任务上取得很好的效果。论文提出的 ViT 模型在大量的图片数据上进行预训练,并将其迁移至下游的图像识别任务上,取得了最好的效果。
论文作者将图片切分为一个个区域,并给这些区域提供一个线性的序列作为 Transformer 的输入。这些区域等同于 NLP 领域的 token。当使用同等规模数据集(中等规模的数据集,ImageNet)进行训练时,没有强正则的 Transformer 模型比 ResNet 低几个点。可能是由于卷积具有 Transformer 不具备的归纳偏置(inductive bias)[^6],即平移等价性(tranlation equivariance)和局部性(locality)。因此在数据量不足的情况下,模型表现不佳。
而当数据集很大的情况(14M-300M)下,论文发现大规模的数据训练能胜过卷积神经网络的归纳偏置。ViT在 ImageNet-21K 数据集和 JFT-300M 数据集上进行预训练后,在多个图像识别基准上超过了现有水平(ImageNet 88.55%,Image-ReaL 90.72%,CIFAR-100 94.55%,VTAB 77.63%)。
什么是归纳偏置?[^6]
归纳偏置在机器学习中是一种很微妙的概念:在机器学习中,很多学习算法经常会对学习的问题做一些假设,这些假设就称为归纳偏置(Inductive Bias)。归纳偏置这个译名可能不能很好地帮助理解,不妨拆解开来看:归纳(Induction)是自然科学中常用的两大方法之一(归纳与演绎, induction and deduction),指的是从一些例子中寻找共性、泛化,形成一个比较通用的规则的过程;偏置(Bias)是指我们对模型的偏好。
因此,归纳偏置可以理解为,从现实生活中观察到的现象中归纳出一定的规则(heuristics),然后对模型做一定的约束,从而可以起到“模型选择”的作用,即从假设空间中选择出更符合现实规则的模型。其实,贝叶斯学习中的“先验(Prior)”这个叫法,可能比“归纳偏置”更直观一些。
归纳偏置在机器学习中几乎无处不可见。老生常谈的“奥卡姆剃刀”原理,即希望学习到的模型复杂度更低,就是一种归纳偏置。另外,还可以看见一些更强的一些假设:KNN中假设特征空间中相邻的样本倾向于属于同一类;SVM中假设好的分类器应该最大化类别边界距离;等等。
在深度学习方面也是一样。以神经网络为例,各式各样的网络结构/组件/机制往往就来源于归纳偏置。在卷积神经网络中,我们假设特征具有局部性(Locality)的特性,即当我们把相邻的一些特征放在一起,会更容易得到“解”;在循环神经网络中,我们假设每一时刻的计算依赖于历史计算结果;还有注意力机制,也是基于从人的直觉、生活经验归纳得到的规则。
在自然语言处理领域赫赫有名的word2vec,以及一些基于共现窗口的词嵌入方法,都是基于分布式假设:A word’s meaning is given by the words that frequently appear close-by. 这当然也可以看作是一种归纳偏置;一些自然语言理解的模型中加入解析树,也可以类似地理解。都是为了选择“更好”的模型。
CNN的inductive bias应该是locality和spatial invariance,即空间相近的grid elements有联系而远的没有,和空间不变性(kernel权重共享);RNN的inductive bias是sequentiality和time invariance,即序列顺序上的timesteps有联系,和时间变换的不变性(rnn权重共享)。
模型结构
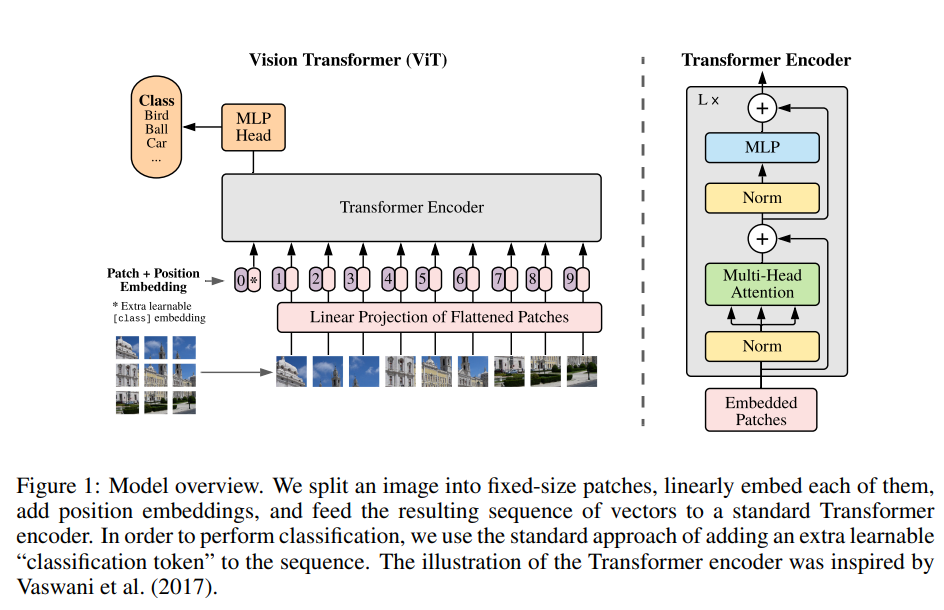
Transformer 模型能够接收 1D 的序列作为输入,因此需要将一个图像 $\boldsymbol{x} \in \mathbb{R}^{H \times W \times C}$ 转换成图像切分区域(path)的序列,每个序列 $x_p \in \mathbb{R}^{N \times (P^2 C)}$ 。区域的数量为 $N = HW / P^2$ ,其中 $(H, W)$ 是原始图像的分辨率、 $C$ 是原始图像的通道数、$(P, P)$ 是每个图像区域的分辨率。由于 Transformer 的每一层使用的是一个 $D$ 维的向量,因此需要使用一个可训练的线性投影将区域映射为一个 $D$ 维的向量。这个输出的投影被称为区域嵌入(path embedding)。
跟 BERT 的[CLS] token 一样,ViT 使用 [CLASS] 作为区域序列的起始 token ,对应的输出作为图像的表征。在预训练时,使用一个带一层隐层的 MLP 作为分类头(classification head);微调时,使用单个线性层作为分类头。
位置编码部分使用可学习的位置编码。之所以采用一维的编码是因为论文发现模型并没有从二维的位置编码中获得明显的收益。
ViT Embedding
ViT PathEmbedding代码如下
# Based on timm implementation, which can be found here:
# https://github.com/rwightman/pytorch-image-models/blob/master/timm/models/vision_transformer.py
class PatchEmbeddings(nn.Module):
    """
    Image to Patch Embedding.

    """

    def __init__(
        self,
        image_size: int = 224,
        patch_size: Union[int, Tuple[int, int]] = 16,
        num_channels: int = 3,
        embed_dim: int = 768,
    ):
        super().__init__()
        image_size = to_2tuple(image_size)  # (224, 224)
        patch_size = to_2tuple(patch_size)  # (16, 16)
        num_patches = (image_size[1] // patch_size[1]) * (image_size[0] // patch_size[0])
        self.image_size = image_size  # height × width
        self.patch_size = patch_size
        self.num_patches = num_patches

        self.projection = nn.Conv2d(num_channels, embed_dim, kernel_size=patch_size, stride=patch_size)

    def forward(self, pixel_values: torch.Tensor, interpolate_pos_encoding: bool = False) -> torch.Tensor:
        batch_size, num_channels, height, width = pixel_values.shape  # 图像数据的维度
        if not interpolate_pos_encoding:  # 不使用插值的位置编码需要判断图像大小是否符合设置
            if height != self.image_size[0] or width != self.image_size[1]:
                raise ValueError(
                    f"Input image size ({height}*{width}) doesn't match model ({self.image_size[0]}*{self.image_size[1]})."
                )
        # self.projection()  bsz×3×224×224 --> bsz×768×14×14
        # flatten(2)         bsz×768×14×14 --> bsz×768×196
        # transpose(1, 2)    bsz×768×196   --> bsz×196×768
        x = self.projection(pixel_values).flatten(2).transpose(1, 2)
        return x
模型将一个/组图片按照一个步长等于卷积核大小的卷积进行卷积操作,得到一个每个子区域卷积后的结果。之后将每个区域的二维张量展开为一维张量作为区域的嵌入。
将图像展开为区域的嵌入后,需要给每个区域增加位置编码和增加特殊token的操作:
class ViTEmbeddings(nn.Module):
    """
    Construct the CLS token, position and patch embeddings. Optionally, also the mask token.

    """

    def __init__(self, config: ViTConfig, use_mask_token: bool = False) -> None:
        super().__init__()

        self.cls_token = nn.Parameter(torch.zeros(1, 1, config.hidden_size))  # CLS token 是一个 1 × 1 × hidden_size 的张量
        self.mask_token = nn.Parameter(torch.zeros(1, 1, config.hidden_size)) if use_mask_token else None  # 1 × 1 × hidden_size
        self.patch_embeddings = PatchEmbeddings(
            image_size=config.image_size,
            patch_size=config.patch_size,
            num_channels=config.num_channels,
            embed_dim=config.hidden_size,
        )
        num_patches = self.patch_embeddings.num_patches
        self.position_embeddings = nn.Parameter(torch.zeros(1, num_patches + 1, config.hidden_size))  # 1 × (num_paths+1) × hidden_size
        self.dropout = nn.Dropout(config.hidden_dropout_prob)
        self.config = config

    def interpolate_pos_encoding(self, embeddings: torch.Tensor, height: int, width: int) -> torch.Tensor:
        """
        This method allows to interpolate the pre-trained position encodings, to be able to use the model on higher
        resolution images.
        这种方法允许对预训练的位置编码进行插值,以便能够在更高分辨率的图像上使用该模型。

        Source:
        https://github.com/facebookresearch/dino/blob/de9ee3df6cf39fac952ab558447af1fa1365362a/vision_transformer.py#L174
        """

        npatch = embeddings.shape[1] - 1
        N = self.position_embeddings.shape[1] - 1
        if npatch == N and height == width:
            return self.position_embeddings
        class_pos_embed = self.position_embeddings[:, 0]
        patch_pos_embed = self.position_embeddings[:, 1:]
        dim = embeddings.shape[-1]
        h0 = height // self.config.patch_size
        w0 = width // self.config.patch_size
        # we add a small number to avoid floating point error in the interpolation
        # see discussion at https://github.com/facebookresearch/dino/issues/8
        h0, w0 = h0 + 0.1, w0 + 0.1
        patch_pos_embed = nn.functional.interpolate(
            patch_pos_embed.reshape(1, int(math.sqrt(N)), int(math.sqrt(N)), dim).permute(0, 3, 1, 2),
            scale_factor=(h0 / math.sqrt(N), w0 / math.sqrt(N)),
            mode="bicubic",
            align_corners=False,
        )
        assert int(h0) == patch_pos_embed.shape[-2] and int(w0) == patch_pos_embed.shape[-1]
        patch_pos_embed = patch_pos_embed.permute(0, 2, 3, 1).view(1, -1, dim)
        return torch.cat((class_pos_embed.unsqueeze(0), patch_pos_embed), dim=1)

    def forward(
        self,
        pixel_values: torch.Tensor,  # 图像输入
        bool_masked_pos: Optional[torch.BoolTensor] = None,
        interpolate_pos_encoding: bool = False,
    ) -> torch.Tensor:
        batch_size, num_channels, height, width = pixel_values.shape  # bsz C H W
        # bsz × C × H × W --> bsz × num_path(seq_len) × emb_size(hidden_size)
        embeddings = self.patch_embeddings(pixel_values, interpolate_pos_encoding=interpolate_pos_encoding)

        batch_size, seq_len, _ = embeddings.size()  # bsz seq_len
        if bool_masked_pos is not None:
            mask_tokens = self.mask_token.expand(batch_size, seq_len, -1)  # bsz × seq_len × hidden_size
            # replace the masked visual tokens by mask_tokens
            mask = bool_masked_pos.unsqueeze(-1).type_as(mask_tokens)
            embeddings = embeddings * (1.0 - mask) + mask_tokens * mask

        # add the [CLS] token to the embedded patch tokens
        cls_tokens = self.cls_token.expand(batch_size, -1, -1)  # bsz × 1 × hidden_size
        embeddings = torch.cat((cls_tokens, embeddings), dim=1)  # bsz × (1+seq_len) × hidden_size

        # add positional encoding to each token
        if interpolate_pos_encoding:
            embeddings = embeddings + self.interpolate_pos_encoding(embeddings, height, width)
        else:  # 不使用插值的位置编码
            embeddings = embeddings + self.position_embeddings  # bsz × (1+seq_len) × hidden_size

        embeddings = self.dropout(embeddings)

        return embeddings
在给每个图像拆分的图像区域序列的起始,增加一个初始值为0的 token。之后给整体embeddings 增加一个初始值为0 的可学习的位置编码,最终得到编码输出。
模型试验
作者设计了三个尺度的 ViT 模型:

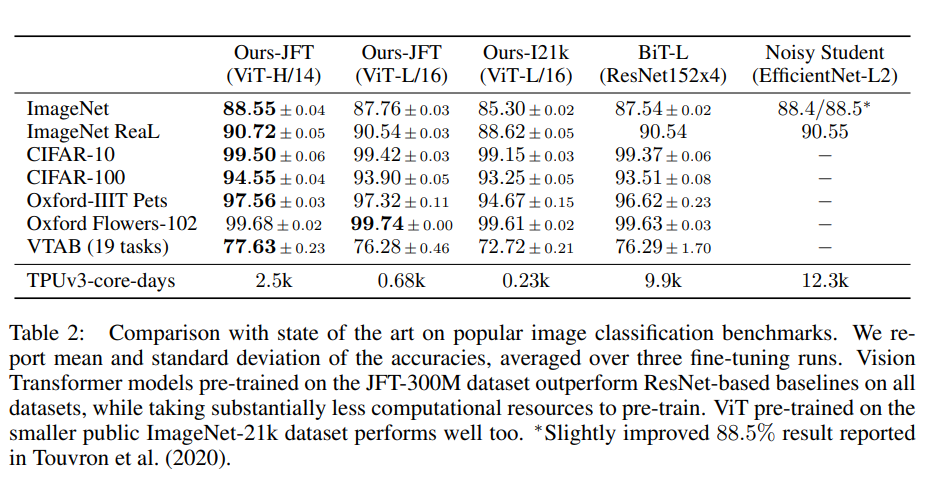
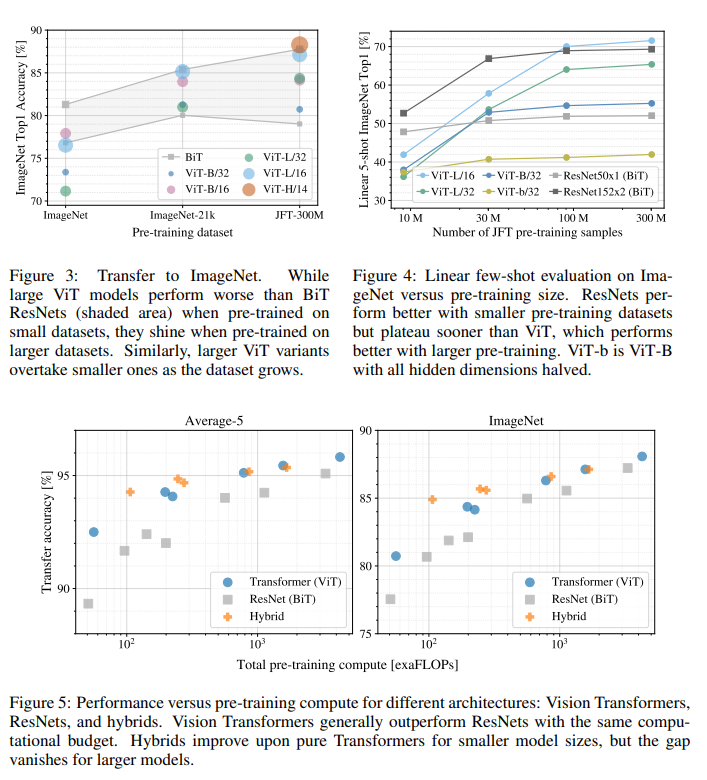
ViT并不像CNN那样具有inductive bias,论文中发现如果如果直接在ImageNet上训练,同level的ViT模型效果要差于ResNet,但是如果在比较大的数据集上petraining,然后再finetune,效果可以超越ResNet。比如ViT在Google私有的300M JFT数据集上pretrain后,在ImageNet上的最好Top-1 acc可达88.55%,这已经和ImageNet上的SOTA相当了(Noisy Student EfficientNet-L2效果为88.5%,Google最新的SOTA是Meta Pseudo Labels,效果可达90.2%)[^5]。
那么ViT至少需要多大的数据量才能和CNN旗鼓相当呢?这个论文也做了实验,结果如下图所示,从图上所示这个预训练所使用的数据量要达到100M时才能显示ViT的优势。transformer的一个特色是它的scalability:当模型和数据量提升时,性能持续提升。在大数据面前,ViT可能会发挥更大的优势[^5]。
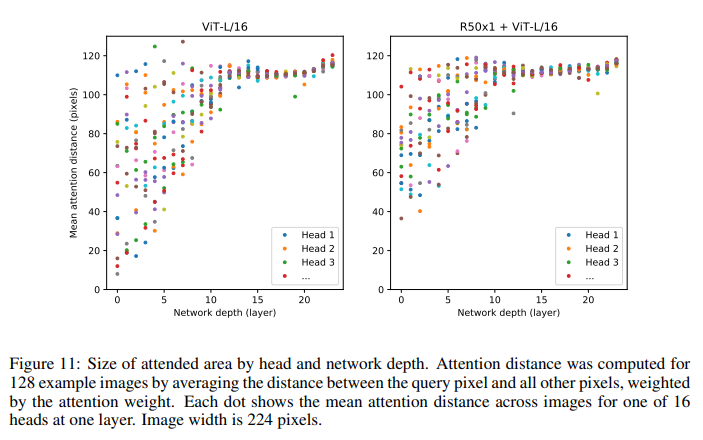
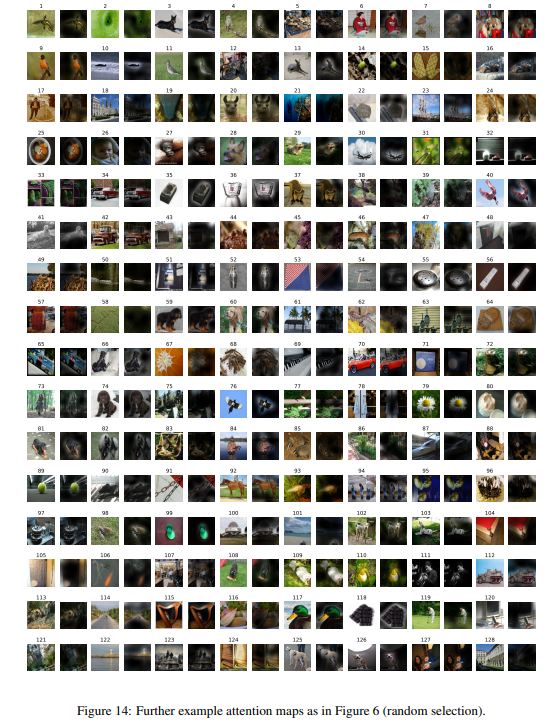
此外,论文中也对ViT做了进一步分析,如分析了不同layers的mean attention distance,这个类比于CNN的感受野。论文中发现前面层的“感受野”虽然差异很大,但是总体相比后面层“感受野”较小,而模型后半部分“感受野”基本覆盖全局,和CNN比较类似,说明ViT也最后学习到了类似的范式[^5]。
当然,ViT还可以根据attention map来可视化模型具体关注图像的哪个部分,从结果上看比较合理:
Til next time,
gqjia
at 09:53

